Here's a tutorial for how to make the strap for your hedgehog carrying bag. You can also use this to make carrying bags for other small animals.
***Please note that these tutorials are for you to make things for your own personal use, not to sell.***
***Please note that these tutorials are for you to make things for your own personal use, not to sell.***
MATERIALS NEEDED
- Sewing Machine
- Fabric
- Iron
- Ironing board
- Thread
First you will need a pouch. You can use one of your existing pouches, or make a new one. Ideally, your pouch should have a wide opening. Follow the tutorial here to make this one . It measures 10.5 x 10.5 inches.
CUTTINGCut a strip of fabric 6 x 29 inches wide. Cut a strip of fabric 6 inches x 19 inches wide.
Note: If you're tall or ample bosom-ed, make the first strip of fabric 33 inches or longer (instead of 29 inches). Make the shorter strap 20 inches. You can join pieces of fabric to make a longer piece if you need.
(One at a time) Iron flat. Fold in half lengthwise and iron flat (creates a middle crease). Open up. Fold both sides inwards to the midline. Iron flat.
Now fold in half again and iron flat.
Open up one fold. Fold one corner down a little past the middle line.
Fold the other corner down to match it.
Tuck the fabric edge under in the middle.
Iron flat. It should look like this. The middle fold, should be in the middle.
SEWING
Fold in half lengthwise and sew the edge. Make sure to back stitch to lock stitches in.
Tip: 1/4 inch seam allowance here
On the other end of the strip of fabric. Open the fold once and fold the bottom edge in. Tuck the corner bits inside as well.
Close the fold and sew the bottom edge. Back stitch to lock stitches in.
Now sew the strip lengthwise along the edge. Repeat the above steps for the other strap side.
Place both strip ends like this with ends pointed opposite ways.
Tie a secure knot.
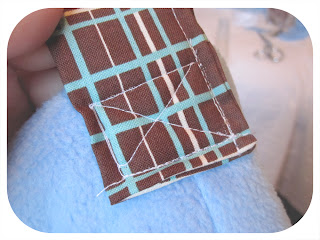
Sew the other sides of the strap to the pouch on the sides, about 1.5 inches overlapping. Create a box with an X in the middle as shown in the next few steps. Always remember to backstitch at the beginning and end.
Turn corners by leaving the needle down in the fabric and then lifting the foot and rotating the fabric. Put the foot back down before you sew again.
Creating the X pattern: Draw the 4 box sides, then draw one diagonal. Sew over one existing line to get to the next corner, then sew the last diagonal line. Backstitch.
You will get something like this (but hopefully more straight and lovely than what I made...). Do this on the other side as well the same amount overlapping the pouch.
Ta da! Now you have a very stylish strap for your hedgie bag.
Because one strap is longer than the other one, the bow tie will be attractively placed around the side of your neck.
It just makes things a little more interesting :)
(Notice the white mask? It's because I'm a ninja! Actually, it's because the fleece bits make me sneeze. You should wear a dust mask too if you have breathing allergies. I find it helps a lot. I take a lint roller to my room before I take the mask off, hehe!)
Don't forget to post your finished pictures in the Flickr group here. I'd love to see what you make!
Don't want to make your own? Email me at bluepandemonium (at) hotmail.com and maybe I can make one for you! I also have some fleece pouches listed in my Etsy shop.
Happy Sewing!
*************************************************************
*************************************************************
Have the tutorials and information on this blog helped you? Then please consider supporting this blog with a generous donation!


No comments:
Post a Comment